What is Apache Iceberg?
Apache Iceberg is an open table format for huge analytics datasets which can be used with commonly-used big data processing engines such as Apache Spark, Trino, PrestoDB, Flink and Hive. You can read more about Apache Iceberg and how to work with it in a batch job environment in our blog post “Apache Spark with Apache Iceberg - a way to boost your data pipeline performance and safety“ written by Paweł Kociński. This technology can be used not only in batch processing but can also be a great tool to capture real-time data that comes from user activity, metrics, logs, from change data capture or other sources. Apache Iceberg provides mechanisms for read-write isolation and data compaction out of the box, to avoid small file problems.
It's worth mentioning that Apache Iceberg can be used with any cloud provider or in-house solution that supports Apache Hive metastore and blob storage.
Kafka Connect Apache Iceberg sink
At GetInData we have created an Apache Iceberg sink that can be deployed on a Kafka Connect instance. You can find the repository and released package on our GitHub.
The Apache Iceberg sink was created based on the memiiso/debezium-server-iceberg which was created for stand-alone usage with the Debezium Server.
Data format that is consumed by Apache Iceberg has to represent table-like data and its schema, therefore we used a format created by Debezium for change data capture. You can read more about this format here.
Change Data Capture example
Let's try to use our sink to replicate the PostgreSQL database using Debezium to capture all changes and stream it to the Apache Iceberg table.
We will run a Kafka Connect instance on which we will deploy Debezium source and our Apache Iceberg sink. A Kafka topic will be used to communicate between them and sink will be writing data to S3 bucket and metadata to Amazon Glue. Later we will use Amazon Athena to read and display the data.
First step: Run Kafka Connect
First authenticate and store AWS credentials in a file, for example ~/.aws/config
[default]
region = eu-west-1
aws_access_key_id=\*\**
aws_secret_access_key=\*\**
Download sink from the Release page, for example path~/Downloads/kafka-connect-iceberg-sink-0.1.3-shaded.jar
For Kafka connect we will use a docker image from Debezium that comes with Debezium source packages. We will mount our Apache Iceberg sink to the Kafka Connect plugin directory and add our AWS credentials file.
docker run -it --name connect --net=host -p 8083:8083 \
-e GROUP_ID=1 \
-e CONFIG_STORAGE_TOPIC=my-connect-configs \
-e OFFSET_STORAGE_TOPIC=my-connect-offsets \
-e BOOTSTRAP_SERVERS=localhost:9092 \
-e CONNECT_TOPIC_CREATION_ENABLE=true \
-v ~/.aws/config:/kafka/.aws/config \
-v ~/Downloads/kafka-connect-iceberg-sink-0.1.3-shaded.jar:/kafka/connect/kafka-connect-iceberg-sink-0.1.3-shaded.jar \
debezium/connect
Second step: Read Data from PostgreSQL Source
One of the possibilities for Debezium to read data from PostgreSQL is to act as a database replica. In order for Debezium to work correctly, we need to increase the amount of information being stored in the write ahead log. To do so, we will need to configure wal_level to logical.
For the purpose of this example we will run PostgreSQL on Docker.
docker run -d --name postgres -e POSTGRES_PASSWORD=postgres \
  -p 5432:5432 postgres -c wal_level=logical
We will also need a Kafka instance. On how to run it on your machine please refer to: Single Node Basic Deployment on Docker
If we don't have our topics auto-creation enabled, we need to create a topic that will be used for communication between the Debezium source and our Apache Iceberg sink. The topic name is composed of a logical name that we will assign to the Debezium source, database schema name and table name.
kafka-topics.sh --bootstrap-server localhost:9092 --create --topic postgres.public.dbz_test --partitions 1 --replication-factor 1
Now we need to deploy the source on Kafka Connect. We can do this using a POST request that contains source configuration. You can read more about the configuration here.
curl -X POST -H "Content-Type: application/json" \
    -d '{
  "name": "postgres-connector",
  "config": {
    "connector.class": "io.debezium.connector.postgresql.PostgresConnector",
    "database.hostname": "localhost",
    "database.port": "5432",
    "database.user": "postgres",
    "database.password": "postgres",
    "database.dbname" : "postgres",
    "database.server.name": "postgres",
    "slot.name": "debezium",
    "plugin.name": "pgoutput",
    "table.include.list": "public.dbz_test"
  }
}' \
    <http://localhost:8083/connectors>
Third step: Apache Iceberg Sink
For our Apache Iceberg sink we are going to need a bucket in S3 for example gid-streaminglabs-eu-west-1and a database in Amazon Glue, for example gid_streaminglabs_eu_west_1_dbz
Since we have the Kafka Connect instance ready including our AWS credentials and package with our sink, what is left is to deploy it. Similarly to PostgreSQL source we will do this using a POST request. You can read more about the configuration here.
curl -X POST -H "Content-Type: application/json" \
    -d '{
  "name": "iceberg-sink",
  "config": {
    "connector.class": "com.getindata.kafka.connect.iceberg.sink.IcebergSink",
    "topics": "postgres.public.dbz_test",

    "upsert": true,
    "upsert.keep-deletes": true,

    "table.auto-create": true,
    "table.write-format": "parquet",
    "table.namespace": "gid_streaminglabs_eu_west_1_dbz",
    "table.prefix": "debeziumcdc_",

    "iceberg.catalog-impl": "org.apache.iceberg.aws.glue.GlueCatalog",
    "iceberg.warehouse": "s3a://gid-streaminglabs-eu-west-1/dbz_iceberg/gl_test",
    "iceberg.fs.defaultFS": "s3a://gid-streaminglabs-eu-west-1/dbz_iceberg/gl_test",
    "iceberg.com.amazonaws.services.s3.enableV4": true,
    "iceberg.com.amazonaws.services.s3a.enableV4": true,
    "iceberg.fs.s3a.aws.credentials.provider": "com.amazonaws.auth.DefaultAWSCredentialsProviderChain",
    "iceberg.fs.s3a.path.style.access": true,
    "iceberg.fs.s3a.impl": "org.apache.hadoop.fs.s3a.S3AFileSystem"
  }
}' \
    <http://localhost:8083/connectors>
Fourth Step: Verifying
Now we can open a psql client and create some tables and data
psql -U postgres -h localhost

create table dbz_test (timestamp bigint, id int PRIMARY KEY, value int);
insert into dbz_test values(1, 1, 1);
insert into dbz_test values(2, 2, 2);
alter table dbz_test add test varchar(30);
insert into dbz_test values(3, 3, 3, 'aaa');
delete from dbz_test where id = 1;
update dbz_test set value = 1 where id = 2;
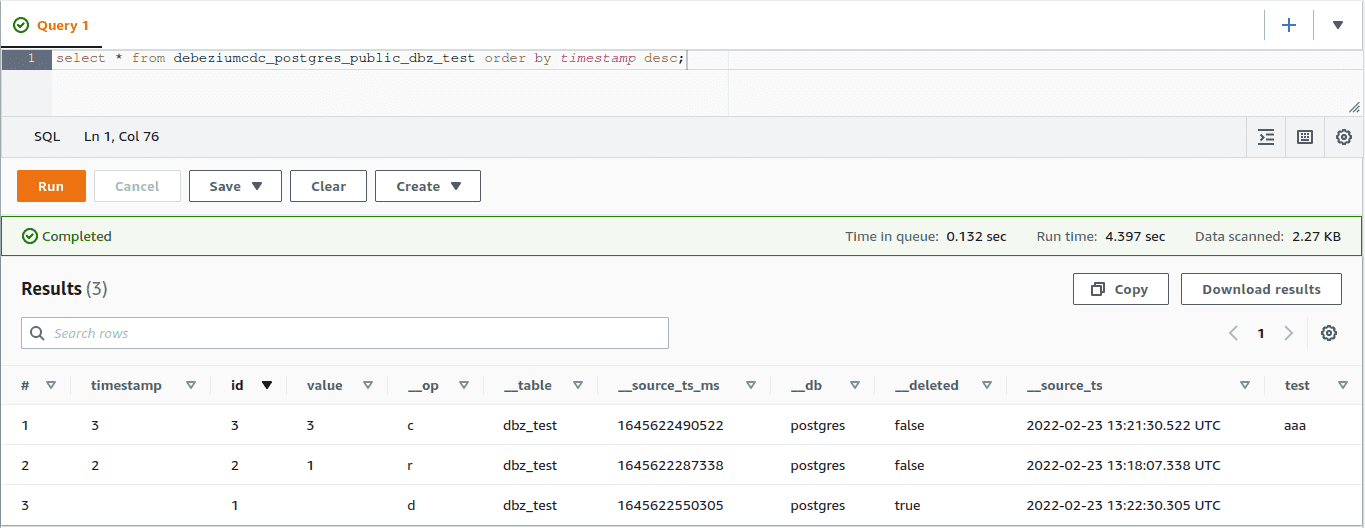
Then go to Amazon Athena and execute the query:
select * from debeziumcdc_postgres_public_dbz_test order by timestamp desc;

Apache Iceberg: Real-time ingestion example with Data online generator
In our blog post: “Data online generation for event stream processing”, we showcased a tool developed in GetInData for data generation based on state machines. Today, we will use it to generate simulated real-time data and stream it to Apache Iceberg tables.
We will be using the exact same scenario as described in that blog post. As a reminder, we are looking at simulated user behavior that interacts with a banking application, can receive income, spend money and take a loan. As output we will have a stream of user clicks in the application, the transaction carried out, current balance and loan information, if one is taken.
First Step: Data format
As stated above, Kafka Connect Apache Iceberg Sink consumes data in the format used by Debezium, so we need to transform our data into it. The format contains both before and after states of a change, but our sink is only interested in the after state so we will be skipping the before part.
One of the events in our example is a current snapshot of the user balance that contains a user_id which is also a primary key, current balance and timestamp of the last change.
First we need to change the event format in Debezium. We have to define structure, values and metadata containing the database, table name and type of operation.
def balance_value_function(timestamp: int, subject: User, transition: Transition) -> str:
    return json.dumps({
        "schema": {
            "type": "struct",
            "fields": [
                {
                    "type": "struct",
                    "fields": [
                        {
                            "type": "int64",
                            "optional": True,
                            "field": "timestamp"
                        },
                        {
                            "type": "string",
                            "optional": False,
                            "field": "user_id"
                        },
                        {
                            "type": "int64",
                            "optional": True,
                            "field": "balance"
                        }
                    ],
                    "optional": True,
                    "name": "doge.balance.Value",
                    "field": "after"
                },
                {
                    "type": "struct",
                    "fields": [
                        {
                            "type": "int64",
                            "optional": False,
                            "field": "ts_ms"
                        },
                        {
                            "type": "string",
                            "optional": False,
                            "field": "db"
                        },
                        {
                            "type": "string",
                            "optional": False,
                            "field": "table"
                        }
                    ],
                    "optional": False,
                    "name": "io.debezium.connector.postgresql.Source",
                    "field": "source"
                },
                {
                    "type": "string",
                    "optional": False,
                    "field": "op"
                }
            ],
            "optional": False,
            "name": "doge.balance.Envelope"
        },
        "payload": {
            "before": None,
            "after": {
                "timestamp": timestamp,
                "user_id": str(subject.user_id),
                "balance": subject.balance
            },
            "source": {
                "ts_ms": timestamp,
                "db": "doge",
                "table": "balance"
            },
            "op": "c"
        }
    })
Next, in order to define the primary key in the Apache Iceberg table we also need to send it as part of the Kafka event key. Please note that optionality of that field is set to False and the field that is used for a key also has to be present as part of the value.
def user_id_key_function(subject: User, transition: Transition) -> str:
    return json.dumps({
        "schema": {
            "type": "struct",
            "fields": [
                {
                    "type": "string",
                    "optional": False,
                    "field": "user_id"
                }
            ],
            "optional": False,
            "name": "user_id.Key"
        },
        "payload": {
            "user_id": str(subject.user_id)
        }
    })
Other events are done in a similar fashion but we don't provide a primary key. Please see the full example here.
Next step: Running Data Online Generator
If we are not using auto-creation of topics, we have to define and create them first.
kafka-topics.sh --bootstrap-server localhost:9092 --create --topic clickstream --partitions 1 --replication-factor 1
kafka-topics.sh --bootstrap-server localhost:9092 --create --topic trx --partitions 1 --replication-factor 1
kafka-topics.sh --bootstrap-server localhost:9092 --create --topic balance --partitions 1 --replication-factor 1
kafka-topics.sh --bootstrap-server localhost:9092 --create --topic loan --partitions 1 --replication-factor 1
Next we need to configure our sink using a POST request
curl -X POST -H "Content-Type: application/json" \
    -d '{
  "name": "doge-iceberg-sink",
  "config": {
    "connector.class": "com.getindata.kafka.connect.iceberg.sink.IcebergSink",
    "topics": "clickstream,trx,balance,loan",
    "upsert": false,
    "upsert.keep-deletes": true,

    "table.auto-create": true,
	"table.write-format": "parquet",
	"table.namespace": "gid_streaminglabs_eu_west_1_dbz",
	"table.prefix": "",

    "iceberg.catalog-impl": "org.apache.iceberg.aws.glue.GlueCatalog",
    "iceberg.warehouse": "s3a://gid-streaminglabs-eu-west-1/dbz_iceberg/gl_test",
    "iceberg.fs.defaultFS": "s3a://gid-streaminglabs-eu-west-1/dbz_iceberg/gl_test",
    "iceberg.com.amazonaws.services.s3.enableV4": true,
    "iceberg.com.amazonaws.services.s3a.enableV4": true,
    "iceberg.fs.s3a.aws.credentials.provider": "com.amazonaws.auth.DefaultAWSCredentialsProviderChain",
    "iceberg.fs.s3a.path.style.access": true,
    "iceberg.fs.s3a.impl": "org.apache.hadoop.fs.s3a.S3AFileSystem"
  }
}' \
    <http://localhost:8083/connectors>
What is left is to run the Data Online Generator
python3 doge_demo_iceberg.py
Last step: Verification
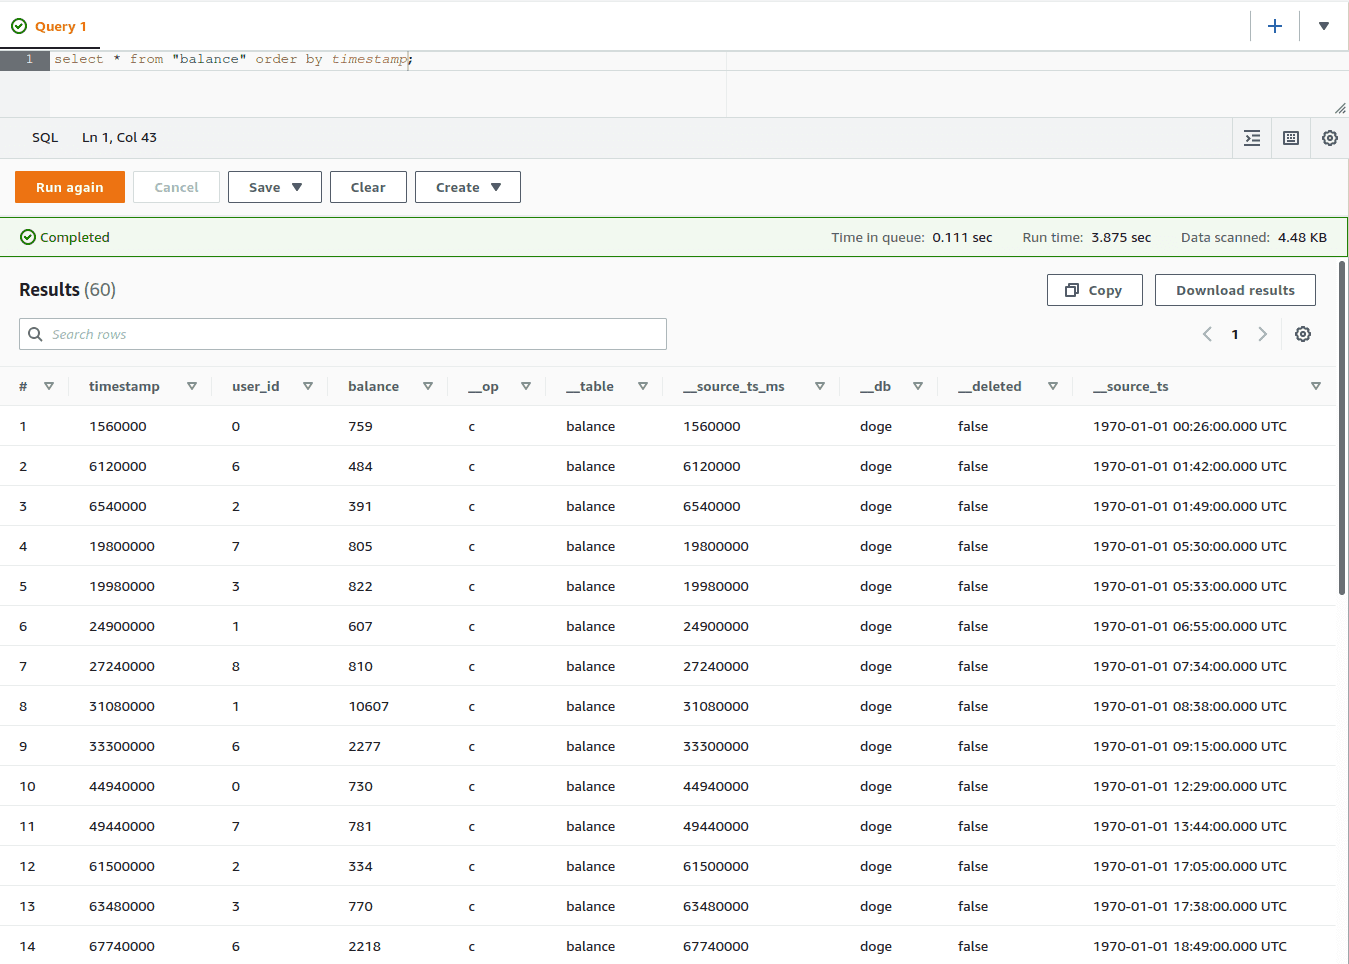
As before, we can open Amazon Athena and display the content of Apache Iceberg tables.
select * from "balance" order by timestamp;

What you might have noticed, is that we have multiple entries for the same user_id which was defined as a key. This is because in this example, we have set the upsert option to false, which makes our sink add new rows instead of replacing existing ones like in the earlier example.
Capabilities and limitations
DDL - Data Definition Language
The creation of new tables and extending them with new columns is supported. Apache Iceberg Sink does not carry out any operations that would affect multiple rows, so in the case of table or column deletion, no data is actually removed. This can be an issue when a column is dropped and then recreated with a different type. This operation can crash the sink as it will try to write new data to an existing column of a different data type.
A similar problem is with changing the optionality of a column. If it was not defined as required when the table was first created, sink will not check if such constraints can be introduced and will ignore it.
DML - Data Manipulation Language
Rows cannot be updated or removed unless the primary key is defined. In the case of deletion, sink behavior is also dependent on the upsert.keep-deletes option. When this option is set to true, Apache Iceberg sink will leave a tombstone behind in the form of row containing only a primary key value and __deleted flat set to true. When the option is set to false it will remove the row entirely.
Apache Iceberg partitioning support
Currently, partitioning is done automatically based on event time. Partitioning only works when the sink is configured in append-only mode:
Partitions will be split by days with a timestamp taken from payload.source.ts_ms field.
Conclusion
We know how time-consuming it can be to write dedicated solutions for data transfer to the Iceberg table. There are quite a lot of different tools that support this action in Kafka Connect, but they are not easy to use. So, we have created our own connector to let you easily dump data into Apache Iceberg tables in real-time. Just download and run it! Check it out here: Kafka Connect Iceberg Sink
If you don’t want to miss any of our upcoming blog posts about real-time processing, Apache Iceberg Sink, Kafka Connect, Data Online Generator and more, subscribe to our newsletter.

